In this post we will see how aws allows us to allow users to upload and download files directly to and from s3 bucket using pre-signed URLs.
# Why use presigned URLs
In conventional file upload implementations, usually files are being uploaded to your server, then forwarded to permanent storage.
We can use presigned URLs to remove the overhead of file upload from the application server, When a user uploads a file to your server, he consumes resources to process the upload, secure it, move it to permanent storage, this is an expensive process, and your application server is being held hostage to the users connection speed to finish the upload.
To have more control over the security of the file, by defining the policy attached to it when generating the presigned URL.
# How it works.
A presigned URL is generated by an AWS user/service who has access to the s3 bucket. The generated URL is then given to the unauthorized user which is the browser in our case.
The presigned URL can be entered in a browser or used by a program or HTML webpage and the credentials used by the presigned URL are those of the AWS user who generated the URL.
You can set an expiry time to the presigned URL, and it remains valid for that limited period of time.
This technique can be used in both upload and download process.
# Working example
We will create a proof of concept for how to use the presigned URLs, you can find the complete project code here (opens new window).
# Create s3 bucket
We will use aws cli to create the s3 bucket we will use in this demo
aws s3api create-bucket --bucket chalice-file-upload-example --region eu-west-1 --create-bucket-configuration LocationConstraint=eu-west-1
# Create project
Now to create the project, follow the steps here.
while in virtualenv, install boto3 library to be able to create our s3 client and communicate with s3
pip install boto3
Now modify app.py and remove the default function
Next we need to create our custom policy to give access to our app to have put and get permissions to/from the s3 bucket.
Since we don't do the write and get operations directly, chalice won't detect the policies needed and create it for us, thus we need to feed it to it manually.
create the file .chalice/app-policy.json and add the following policy to it:
{
  "Version": "2012-10-17",
  "Id": "default",
  "Statement": [
    {
      "Effect": "Allow",
      "Action": [
        "s3:PutObject",
        "s3:GetObject"
      ],
      "Resource": [
        "*"
      ],
      "Sid": "7c63961793a94a0288fbc41fa3fbe620"
    }
  ]
}
now modify .chalice/config.json and add the following keys to the stage you are deploying (dev by default)
      "autogen_policy": false,
      "iam_policy_file": "app-policy.json"
This will configure chalice to not generate the policy by default, and use our custom created one.
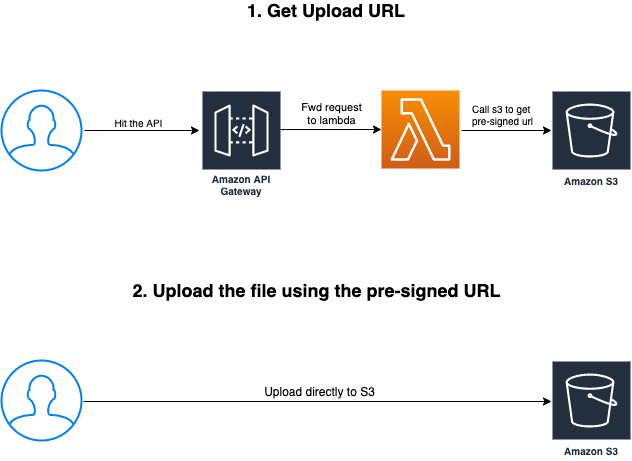
# Upload Process
This diagram explains the steps we need to take in order to upload a file, the user will make a request to the API to ask for permissions to upload, then will get a response with the URL to use in the upload process to the s3 bucket.
Now let us Create the first function to get the upload URL. Replace the content of app.py with the following:
from chalice import Chalice
import boto3
import logging
from botocore.exceptions import ClientError
app = Chalice(app_name='file-upload')
bucket_name = "chalice-file-upload-example"
expiration = 60
@app.route('/get-upload-url', methods=['POST'])
def get_upload_url():
    request = app.current_request
    payload = request.json_body
    object_name = payload['filename']
    s3_client = boto3.client('s3')
    try:
        response = s3_client.generate_presigned_post(bucket_name,
                                                     object_name,
                                                     ExpiresIn=expiration)
    except ClientError as e:
        app.log.error(e)
        return None
    return response
now lets deploy our application
chalice deploy
once deployed, we are ready to call the get-upload-url endpoint (remember to change the api URL with the one in the output from the deploy process)
curl --location --request POST 'https://3stmxegzqj.execute-api.eu-west-1.amazonaws.com/api/get-upload-url' \
--header 'Content-Type: application/json' \
--data-raw '{
	"filename": "image.jpg"
}'
The response will contain the upload URL and some fields that the user need to send with the upload request, it will look like this:
{
   "url":"https://chalice-file-upload-example.s3.amazonaws.com/",
   "fields":{
      "key":"image.jpg",
      "AWSAccessKeyId":"ASIA6HPIZFAXCBPS4KVA",
      "x-amz-security-token":"IQoJb3JpZ2luX2VjEGgaCWV1LXdlc3QtMSJHMEUCIQCIf6TA+YiZCiHng1CzUj+KyGqUoBPkGR0/XZs05AfE2wIgVlR47L0tkeHlIu9XOrnzZDOa8z5+MLd/ItD4NeS/APwq1wEIsf//////////ARABGgw5NzgxMzAxMTg3MDIiDETKrj3UlRYj7Lgl2iqrAR4UD2QFiKzlqjewW2RMFOERab7jnKX1hPNAfe4AEKnDUza0Y/wJvLsJmykjGoy8b+Pt0pLTafNawaQAAIaVH+604+kXI2mgB6iWtlHfpTOBSgiwru0mDPzkPFgU+YsscC64ranxoozKUMSk46FDo4Z4jVTyO2gDZzGVp5vizlBSzQUahHyPUKJ2M+MALRlS+JquLaUBciaa7ei1ak6/c7MhSN5L7ynM5lPpHjDm8IH2BTrgAUXztxRm/yuoMc6PItG+gj74Eoe2r/SEl6vrYUu1I5Xeo+B/uEhNdvRETIKt8akzeCwRYx64ncmbWiOmCnrGzhyf6ogiv1OXx1LD1CccxT5tUcuqqQUlHQGWbkn95V7ZUi9BZWgrQGQBDW7zKneM7cfiXyHyCuMwOKRFYp+11vWj7qlr3gGqQiAKxG+rvRGKqmQPJHijIdfWoGrfb92bgHG1GnEgXDtc/QEh89Il2bB8nJUXm1sSNo6dBZ/M+GRzdcxqDzBPYt8xmqSY8jeNJ6juwNzj7yW8KTnBnTAeMn2M",
      "policy":"eyJleHBpcmF0aW9uIjogIjIwMjAtMDUtMTdUMDA6MDQ6MjJaIiwgImNvbmRpdGlvbnMiOiBbeyJidWNrZXQiOiAiY2hhbGljZS1maWxlLXVwbG9hZC1leGFtcGxlIn0sIHsia2V5IjogImltYWdlLmpwZyJ9LCB7IngtYW16LXNlY3VyaXR5LXRva2VuIjogIklRb0piM0pwWjJsdVgyVmpFR2dhQ1dWMUxYZGxjM1F0TVNKSE1FVUNJUUNJZjZUQStZaVpDaUhuZzFDelVqK0t5R3FVb0JQa0dSMC9YWnMwNUFmRTJ3SWdWbFI0N0wwdGtlSGxJdTlYT3JuelpET2E4ejUrTUxkL0l0RDROZVMvQVB3cTF3RUlzZi8vLy8vLy8vLy9BUkFCR2d3NU56Z3hNekF4TVRnM01ESWlERVRLcmozVWxSWWo3TGdsMmlxckFSNFVEMlFGaUt6bHFqZXdXMlJNRk9FUmFiN2puS1gxaFBOQWZlNEFFS25EVXphMFkvd0p2THNKbXlrakdveThiK1B0MHBMVGFmTmF3YVFBQUlhVkgrNjA0K2tYSTJtZ0I2aVd0bEhmcFRPQlNnaXdydTBtRFB6a1BGZ1UrWXNzY0M2NHJhbnhvb3pLVU1TazQ2RkRvNFo0alZUeU8yZ0RaekdWcDV2aXpsQlN6UVVhaEh5UFVLSjJNK01BTFJsUytKcXVMYVVCY2lhYTdlaTFhazYvYzdNaFNONUw3eW5NNWxQcEhqRG04SUgyQlRyZ0FVWHp0eFJtL3l1b01jNlBJdEcrZ2o3NEVvZTJyL1NFbDZ2cllVdTFJNVhlbytCL3VFaE5kdlJFVElLdDhha3plQ3dSWXg2NG5jbWJXaU9tQ25yR3poeWY2b2dpdjFPWHgxTEQxQ2NjeFQ1dFVjdXFxUVVsSFFHV2Jrbjk1VjdaVWk5QlpXZ3JRR1FCRFc3ektuZU03Y2ZpWHlIeUN1TXdPS1JGWXArMTF2V2o3cWxyM2dHcVFpQUt4RytydlJHS3FtUVBKSGlqSWRmV29HcmZiOTJiZ0hHMUduRWdYRHRjL1FFaDg5SWwyYkI4bkpVWG0xc1NObzZkQlovTStHUnpkY3hxRHpCUFl0OHhtcVNZOGplTko2anV3TnpqN3lXOEtUbkJuVEFlTW4yTSJ9XX0=",
      "signature":"j0j+LgCdwALD3ksT/OB6MBDOmB0="
   }
}
Now we can use these details to upload our file directly to the S3 bucket:
curl --location --request POST 'https://chalice-file-upload-example.s3.amazonaws.com/' \
--header 'Content-Type: application/x-www-form-urlencoded' \
--form 'AWSAccessKeyId=ASIA6HPIZFAXK2BQB3WL' \
--form 'x-amz-security-token=IQoJb3JpZ2luX2VjEGYaCWV1LXdlc3QtMSJIMEYCIQCOSGAyZRiwf7msl9bdb603pLv7zWuDM6A6yZv2Acyu4gIhANNDRiW5mPWDh8bj4a5AcxOK/3StA/O0x9fcnCyce9VaKtcBCK///////////wEQARoMOTc4MTMwMTE4NzAyIgycQ0mRocZ4lsprKQwqqwEkRwQYxbUt4Q1FZwBzJfqxB4I5FedxiXf5o2Db/y0p2O+5mLAdijqKCajJmVJ7DoKH3xG+i0dQGWmD1FeoR8H5vwk7hKv0j3adYkIfWAC/eNH/jzY1IfVd1CEkhikJbkzua4wtwWELCJFU86v1mSJva0rMn73P23W7H11SeFo4klD7vtfN7gnq/qhGMTdnO5miBceFmeveQfR3c/+VJQdcMdaHpKItLNwrOVowhsCB9gU63wGFKCciITnI+6oZgwV/QUy/G35YErKECQ1C8bPRvLi+oS/mmMOF8TMJU+OMH3sieKDInLabobKjztnL8lBITPvGf2T/Du2J81cvLdM49Kfjb0EYD6oZ9pfuegSWP3rrBmdS3w/4/KDjYnsG+qs7XV23fbE3taQKplZ2zEMPG6qx0YT+nLF+OLWP7DpCkHFGdNlgeLQGGHMaUHolaU/SDTKWXcLYItLB0CW2FVkdEsLoRlfDAw86WosfEdC2YCph8QXwIFqHhpeO3L1Qj0LT9OFtBJRERXk6EyO9Q6XSWCW9' \
--form 'policy=eyJleHBpcmF0aW9uIjogIjIwMjAtMDUtMTZUMjI6MjA6MDBaIiwgImNvbmRpdGlvbnMiOiBbeyJidWNrZXQiOiAiY2hhbGljZS1maWxlLXVwbG9hZC1leGFtcGxlIn0sIHsia2V5IjogImltYWdlLmpwZyJ9LCB7IngtYW16LXNlY3VyaXR5LXRva2VuIjogIklRb0piM0pwWjJsdVgyVmpFR1lhQ1dWMUxYZGxjM1F0TVNKSU1FWUNJUUNPU0dBeVpSaXdmN21zbDliZGI2MDNwTHY3eld1RE02QTZ5WnYyQWN5dTRnSWhBTk5EUmlXNW1QV0RoOGJqNGE1QWN4T0svM1N0QS9PMHg5ZmNuQ3ljZTlWYUt0Y0JDSy8vLy8vLy8vLy8vd0VRQVJvTU9UYzRNVE13TVRFNE56QXlJZ3ljUTBtUm9jWjRsc3ByS1F3cXF3RWtSd1FZeGJVdDRRMUZad0J6SmZxeEI0STVGZWR4aVhmNW8yRGIveTBwMk8rNW1MQWRpanFLQ2FqSm1WSjdEb0tIM3hHK2kwZFFHV21EMUZlb1I4SDV2d2s3aEt2MGozYWRZa0lmV0FDL2VOSC9qelkxSWZWZDFDRWtoaWtKYmt6dWE0d3R3V0VMQ0pGVTg2djFtU0p2YTByTW43M1AyM1c3SDExU2VGbzRrbEQ3dnRmTjdnbnEvcWhHTVRkbk81bWlCY2VGbWV2ZVFmUjNjLytWSlFkY01kYUhwS0l0TE53ck9Wb3doc0NCOWdVNjN3R0ZLQ2NpSVRuSSs2b1pnd1YvUVV5L0czNVlFcktFQ1ExQzhiUFJ2TGkrb1MvbW1NT0Y4VE1KVStPTUgzc2llS0RJbkxhYm9iS2p6dG5MOGxCSVRQdkdmMlQvRHUySjgxY3ZMZE00OUtmamIwRVlENm9aOXBmdWVnU1dQM3JyQm1kUzN3LzQvS0RqWW5zRytxczdYVjIzZmJFM3RhUUtwbFoyekVNUEc2cXgwWVQrbkxGK09MV1A3RHBDa0hGR2RObGdlTFFHR0hNYVVIb2xhVS9TRFRLV1hjTFlJdExCMENXMkZWa2RFc0xvUmxmREF3ODZXb3NmRWRDMllDcGg4UVh3SUZxSGhwZU8zTDFRajBMVDlPRnRCSlJFUlhrNkV5TzlRNlhTV0NXOSJ9XX0=' \
--form 'signature=EX7rJexlHakCe1hWQnhzOLCYHOk=' \
--form 'key=image.jpg' \
--form 'file=@/Users/ahmed/Desktop/image.jpg'
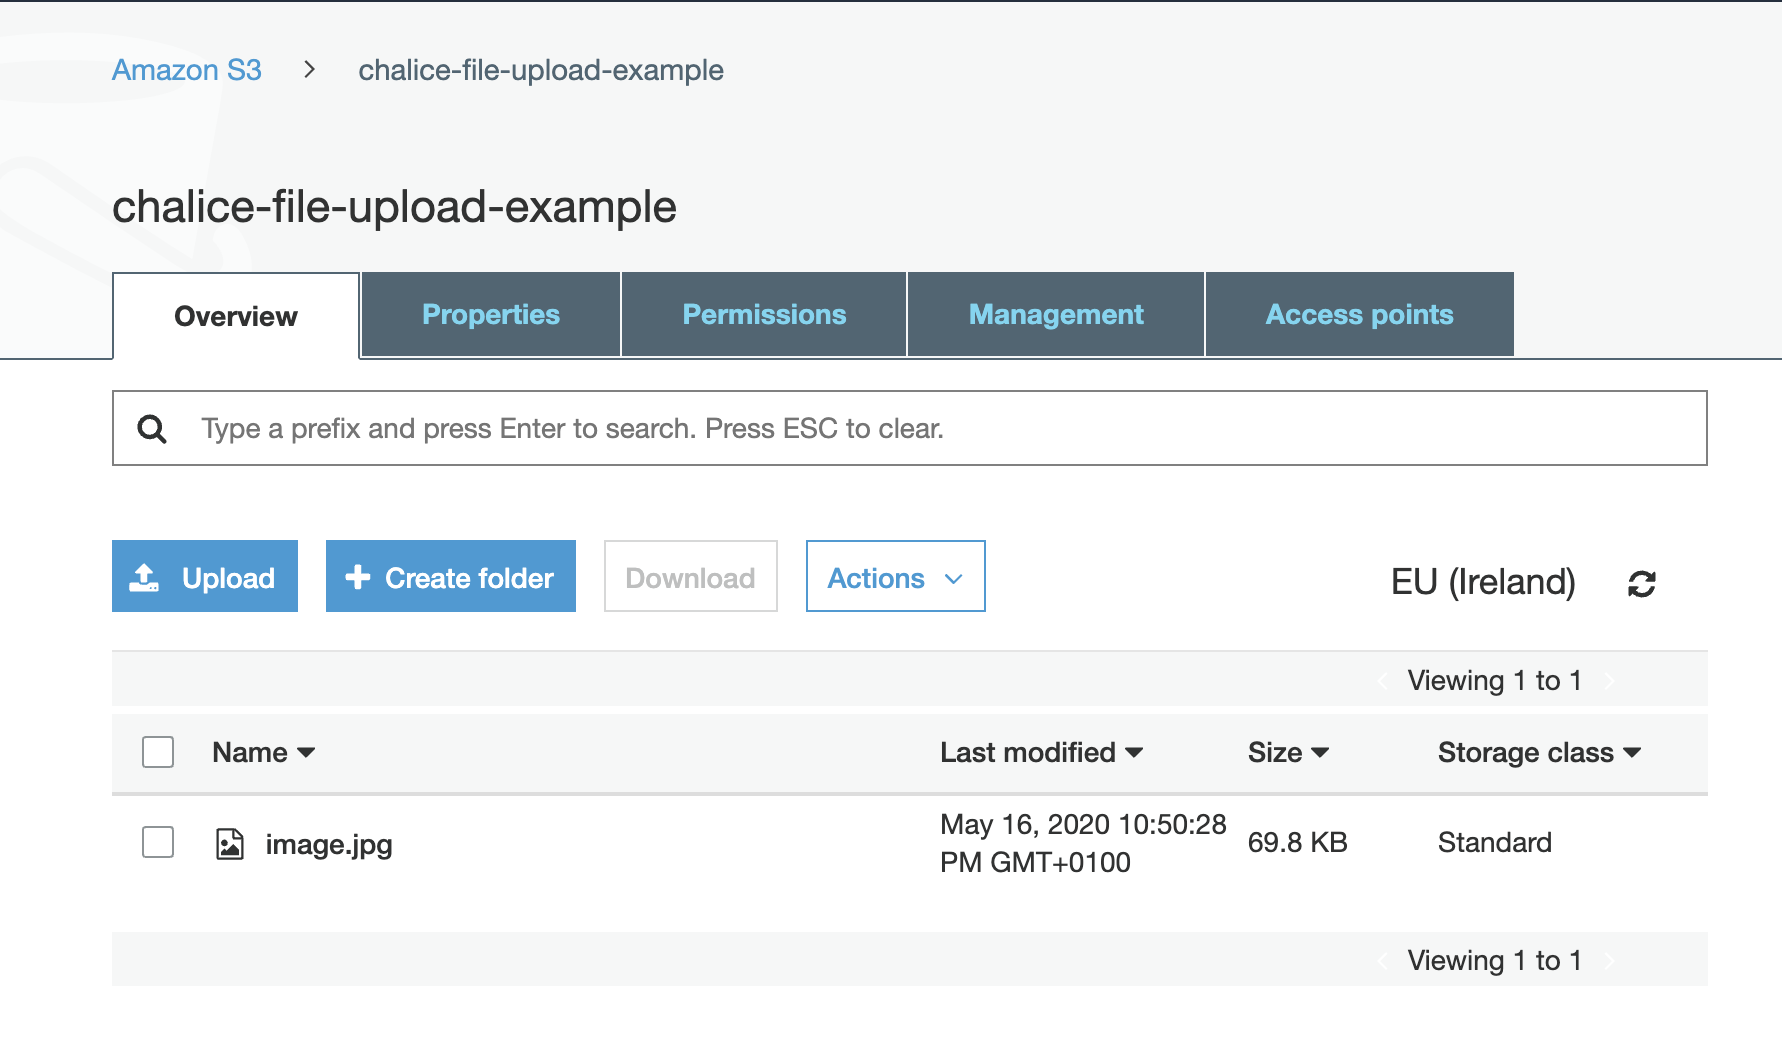
If you browse to your aws console, you should be able to see the file in the s3 bucket
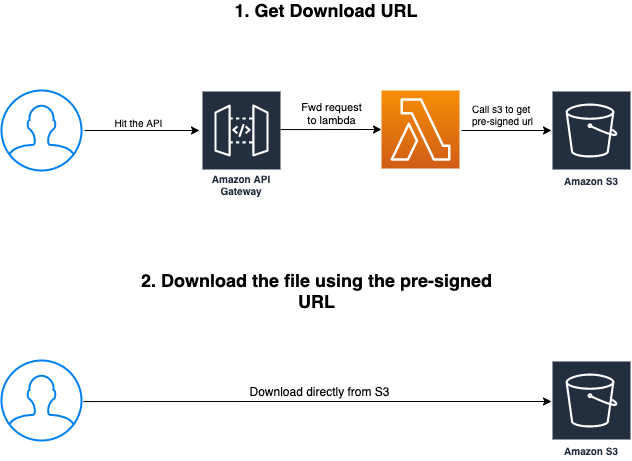
# Download Process
Now this diagram explains the steps we need to take in order to download a file from s3 bucket, the user will make a request to the API to ask for permissions to download a file, then will get a response with the URL to download that file.
Now add the get-download-url function to our app.py
@app.route('/get-download-url', methods=['POST'])
def get_download_url():
    request = app.current_request
    payload = request.json_body
    object_name = payload['filename']
    s3_client = boto3.client('s3')
    try:
        response = s3_client.generate_presigned_url('get_object',
                                                    Params={'Bucket': bucket_name,
                                                            'Key': object_name},
                                                    ExpiresIn=expiration)
    except ClientError as e:
        app.log.error(e)
        return None
    return response
and time to deploy our application one more time
chalice deploy
Once deployed, we can invoke our function to get the download URL
curl --location --request POST 'https://3stmxegzqj.execute-api.eu-west-1.amazonaws.com/api/get-download-url' \
--header 'Content-Type: application/json' \
--data-raw '{
	"filename": "image.jpg"
}'
The response will have the URL we can use to download the file, it will like as follows:
https://chalice-file-upload-example.s3.amazonaws.com/image.jpg?AWSAccessKeyId=ASIA6HPIZFAXPSKWFOGD&Signature=Wkg7bC%2Fx4D0wYIXEUpj7Br4K6DQ%3D&x-amz-security-token=IQoJb3JpZ2luX2VjEGgaCWV1LXdlc3QtMSJHMEUCIHpYLAnpdJSgafJFFlsAoLWDIIC20TYMorsOY3KomFxWAiEAisTmzRTjaE2I6UjTd9bVE1ts%2BccVAmfdZjHWHZUUR9Uq1wEIsf%2F%2F%2F%2F%2F%2F%2F%2F%2F%2FARABGgw5NzgxMzAxMTg3MDIiDGS8uUF%2BoLRLRcM74CqrASHM9suceJ7Ct4BVy12U9V7WSpye%2Fql6klTI4YGdT2om7DSSksmVLhDIjLzy2vh5jVgSnJMUWEi62iB5sHesfzdUbQxgXDBkdVTkmcxj4oUto4D%2FTQyEl6Tp9F8TJBGkVaVPmAHzObHuCyPK0JVy6QgsfZRmxnefUSHOIpha%2BOVRK5CBFaItSBR%2BC8WXBOco3jQmMxiGxNLKqj8SBAHXwTID%2BgQg3oxns%2B%2Fs4TCd%2BoH2BTrgAYlgAkl4xudrBsgjCCG58310pIZIVxYLPlKqg8nSsymHtcc2pBT6I5WnBuOwFHrrhyWOTL2Fo5G1OAesHLuSgpHCsjfPWkNC9fNhhfa%2FzcpQEE4kHSujT1eRqP9uT3fG6fFluGKl1aafrYbl9Bs5UcA0v1Q3KTUWUaUOHiFjRSVYP%2BJdcv8V9LW0NdrrKNOpFjoX3jp2EAyextyWVFawx88zj9Je%2FW3AqhOexQSoRjgpMtWQ42QDauoDOADwbGi8IlfLsKBleYrSG%2FxMFJ%2F00QqCfdgYo30XSZCMTtH9MFAW&Expires=1589675046
You can then open this URL in the browser to download the file, and this URL will expire once the expiry time has passed.
The complete code for this example is available here here (opens new window).